 HTC company has announced the latest flagship HTC One M9 at MWC 2015, The device comes with a strong chipsets than the previous model HTC One M8 and attractive design of aluminum as well. Recently, Team Win Recovery Project has developed TWRP custom recovery to the M9, TWRP recovery brings many advanced features than your device’s stock recovery.
Today we will look into one of these features, its installing root access. This topic will show you how to root HTC One M9 & Install TWRP custom recovery as well, The tutorial will be divided into two processes, the first is installing TWRP recovery and the second is rooting the device, This works on the international, T-Mobile, and Sprint variants.
Warning:
- Read, Follow this guide carefully, and do this at your own risk.
- This will void your device’s warranty.
Requirements:
- UnLocked bootloader HTC One M9, unlock it by following the instructions at HtcDev, or follow our guide: How to UnLock HTC One M8 BootLoader, Select “All Other Supported Models” on “Select Your Device” instead of HTC One M8, Warning: unlocking bootloader will wipe data.
- TWRP latest recovery file.
- Chainfire’s BETA SuperSU zip file, Dont use another file.
- Windows PC and USB cord.
- HTC Sync Manager software, ADB and Fastboot installed on your PC, you can get adb&fastboot by following this post: How to Install ADB, Fastboot and Drivers in Few Seconds.
Instructions: How to Install TWRP custom recovery on HTC One M9
- Place the downloaded TWRP recovery file into adb and fastboot folder on your computer then rename it to twrp.img or to twrp only if file extensions in folder options is hidden.
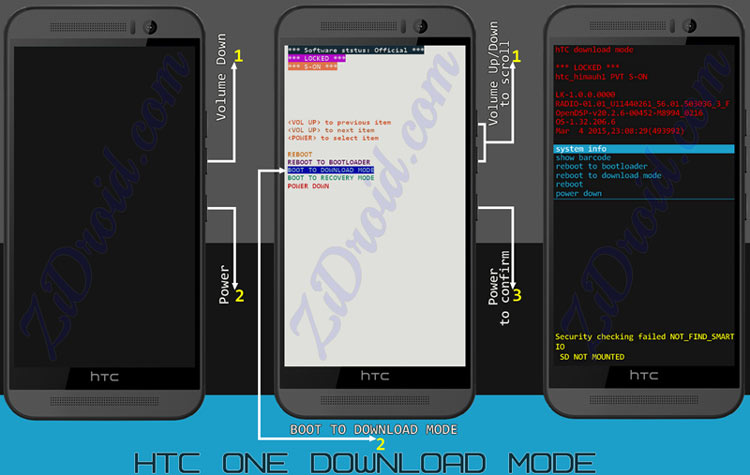
- Turn off your M9 to put it into Download Mode, by Pressing and holding Volume Down key and Power simultaneously, Scroll to BOOT TO DOWNLOAD MODE using the volume keys, and Select using Power key.
- Plug your device to PC via the original USB cable, wait until windows install the required updates and the PC recognize your HTC phone.
- Go to adb and fastboot folder and Open command prompt by holding down your keyboard’s Shift + Right click on any empty space then Choose Open command window here.
- If you renamed the TWRP file you downloaded earlier to twrp step1, Type the following command copy/paste carefully then hit enter:
fastboot flash recovery twrp.img

- Now you are done!, On your device navigate to reboot to bootloader, once your device in bootloader mode navigate to BOOT TO RECOVERY MODE.
That’s it.
Its highly Recommended before modifying system or rooting to do a NANDROID backup!!! (YOU SHOULD DO IT)
On the HTC One M9, any changes to system will cause OTAs to fail, its confirmed by the updater-script. The first thing everyone will need to do before flashing ANYTHING is make a backup of system.
TWRP for the M9 is set up to mount system as read-only to prevent any checksum changes. Any backup taken of system is done via dd, which means the backup is done in image format and should exactly match the original check-sum if/when restored.
Instructions: How to root HTC One M9 using TWRP recovery
- Place the downloaded “UPDATE-SuperSU-vx.xx.zip” file into your HTC One M9 for ex: Download folder.
- Reboot into recovery mode (Volume Down + Power key simultaneously, Scroll to BOOT TO RECOVERY MODE).
- Once your device in TWRP recovery mode, Press Install navigate to “UPDATE-SuperSU-vx.xx.zip” file, Select that file, Swipe to Confirm Flash, then Reboot System.


NOTE: If you are having issues installing SuperSU zip file because system is mounted read-only,
– Go to the main screen of TWRP, Press Advanced, Choose Terminal Command, Press the Select button to start the terminal, and then type the following command:
mount -t ext4 /dev/block/bootdevice/by-name/system /system


Hit Go button, Back to the main screen, then follow rooting instructions.
Once your device reboot you will find SuperSu icon ![]() in the App drawer, if you want to confirm root access download any App require root access or download “Root checker” App from Google Play store.
in the App drawer, if you want to confirm root access download any App require root access or download “Root checker” App from Google Play store.
Source: 1


 Creative Commons 4.0