Google Nexus devices is the first devices to receive the latest Android updates before any other devices, and you can update it using OTA which update the system files without wiping data, but OTA update doesn’t arrive to all users at the same time for unknown reasons and some times it doesn’t arrive because you’re rooted.
In this case you have only one way to update it by flashing system files to your device, its well known that flashing factory firmware wipes all data and resets your device to the default factory settings.
In this post we will introduce to you how to flash/update Google Nexus devices (ex: Nexus 4, Nexus 5, Nexus 6, Nexus 7, Nexus 9, Nexus 10, …etc) to Android Jelly Bean, KitKat, or Lollipop without losing any saved data or installed apps on your device.
Requirements:
- Charged (at least 50%) Unlocked bootloader Google Nexus device doesn’t matter which model it works for all, if the bootloader is locked there’s no way to do this without wiping your data.
- Installed ADB, fastboot and drivers on your computer.
- Factory images FILE for your specific Nexus Devices.
- Notepad++ installed on your PC.
Steps will be applied to Nexus 5 (hammerhead) as example on windows:
- Make sure your Nexus device is unlocked bootloader.

- Backup your important files in case this process corrupt some data.
- Extract the downloaded factory images file “.tgz” using any extracting tool.

- Put the extracting files in the adb directory.

- Right click “flash-all.bat” file “flash-all.sh” for mac and Linux and edit it with Notepad++.
- Search the following line (at the end) and change it from:
fastboot -w update image-hammerhead-lmy47d.zip - to:
fastboot update image-hammerhead-lmy47d.zip - Save the changes to the file.

- Start your device in fastboot mode by shutting it down then press and hold Volume Down + Power till it boot up in fastboot mode or reboot into fastboot mode using ADB cmd.
- While your Nexus in fastboot mode double click “flash-all.bat” for mac run “./flash-all.sh” in terminal.
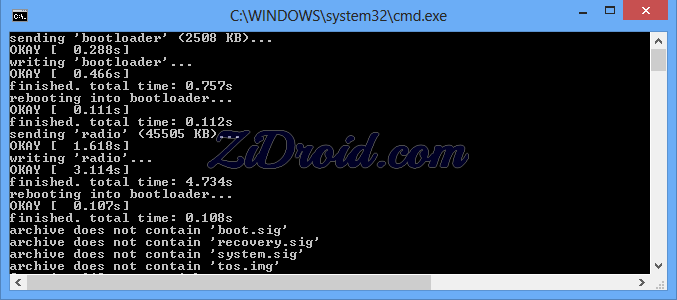
- Don’t touch anything and let the script to install the firmware’s files.
- Once it finishes, your device will reboot, for the first boot it will take a while.
Note:
– This method is useless for locked bootloader it only for unlocked bootloader.
– This will delete the root access in your device.
– If you have any problems in the system or in some apps after updating your device using this method, factory data reset is recommended to fix it.


 Creative Commons 4.0
One comment
Pingback: How to Install Android M Developer Preview on Nexus 5, 6, 9